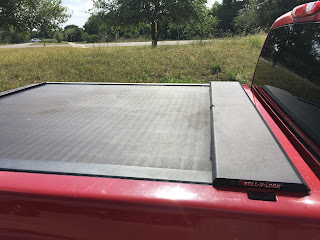
Simple Explanation of Fishing a Drop-shot Rig

 Sometimes you have to slow down and finesse fish.

A drop-shot rig is a popular technique for bass fishing, especially for targeting fish in deep water. Here's how to rig and fish a drop-shot rig:

 Start by tying a hook to the line about 18 inches above the sinker. The hook should be facing upwards. A Palomar knot is a good knot to use. Once the knot is tied (with 18" or more of a tag end, run the line back through the hook eye, which helps keep the hook point facing up.

The bait is 18-24- inches above the weight.

Next, attaching a sinker to the end of your fishing line. This will be the weight that takes the bait down to the desired depth. Some weights are designed specifically for drop-shotting.

Now you can add your bait to the hook. Live worms, soft plastic baits, or small crayfish are all good options.


In open water, you can use an open-hook set up.


There are weights designed especially for drop shots.
Notice how the line attached to the weight.

 Once your rig is set up, cast it out and let the sinker take the bait down to the desired depth.

Once the bait is at the desired depth, slowly retrieve the line, making sure to keep the bait near the bottom. The key to drop-shotting is to keep the bait in the fish's face.

Pay attention to your line, and when you feel a fish biting, set the hook by quickly reeling in the slack and pulling back on the rod.

Once you have a fish on the line, reel it in carefully, making sure not to let it get too close to any structure that could break the line.

 Repeat the process until you have caught all the fish you want, or the bite slows down.

 Remember, you can adjust the depth of your bait by changing the size of the sinker and the length of the leader.


How to fix: marine bilge pumps, thru-hull fittings, and more

Does your bilge pump seize up? Here's a trick.

DYI bilge pumps and leaking thru-hull fittings

Over the years, I've had bilge pumps seize up because debris or worse, fishing line, ended up wrapping around the impeller. Bam! No working bilge pump. It happened once when I was in a huge downpour on Sam Rayburn Reservoir. Not only was I taking on water from the rain, but it was super windy and waves were crashing in the boat.

We had so much water come in, we could not get on plane. No working bilge pump either!

If I had ordered the boat new from the factory, I would have had a second bilge pump installed. (I highly recommend this.) As it was, I bought the boat new from dealer's stock. (See my earlier blog posts about my boat-buying quest.)

We had to idle in; we barely made it.

After the trip, I replaced the bilge pump. It worked great, but I still had a leak. Here I go again — take everything out so I can get to the the bilge area. Got to find that leak.

To get to the bottom of the bilge area, I need to take out one battery and two PowerPole pumps. It's not hard, but a pain none the less.

Once I got to where I could reach the hoses, I noticed one hose fitting on a thru-hull fitting seemed loose. So I gave it a little wiggle. Guess what? The fitting was split at the water line. No wonder it was leaking. Below is a photo of the broken thru-hull (right) and a new stainless steel replacement fitting (left).

From first look, the broken fitting looks like a stainless steel fitting. Is is not. Ok, permanent fix time: I replaced every thru-hull fitting with stainless steel fittings. For my boat, I needed both 3/4 inch and 1-1/8 inch fittings. See links below to Attwood brand fittings on Amazon.


hose fittings for marine applications
New stainless steel thru-hull vs. broken factory installed fitting


Back to the bilge pump problem. Once again, my bilge pump failed. Now why? Yup, more line wrapped in the impeller. Somehow a chunk of braided line went to the bottom of my hull. It was a piece I remember pulling out of the water someone discarded. I put it in a small compartment in my boat. I surmise my grandson was playing while we were fishing and found it. He probably thought it was cool to stuff it through the drain plate on the floor. It eventually made it to the pump. When I took the pump off, half of the line was bound inside and part of it still was on the outside of the bracket.

It hit me. The slots/holes on the bracket are too big — big enough to let in debris and line. Time to solve that problem.

Your bilge pump may look like mine shown here. Mine has a 1-1/8 inch hose requirement.
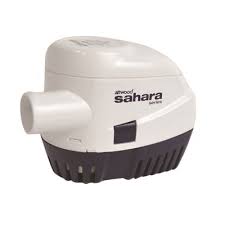
attwood brand bilge pump
attwood 1100 GPH bilge pump
Notice the tabs above the mounting bracket? Just squeeze both sides and you can lift the pump assembly out of the holder. That makes it easy to replace the pump. (After detaching/attaching hose, and rewiring the new pump in.)

Here is an Amazon link to the bilge pump: attwood 1100 gph bilge pump.

But that really doesn't prevent the same issues I had been having. (Remember, getting line and debris inside the impeller area.)

When you buy a new pump, it comes with a new bracket. I set it aside (in case my idea didn't work) and removed the old bracket from the bottom of the hull.

Then drilled small holes all the way around the bracket. I was careful not to drill where there could be weak spots, the release tabs may be affected or if a wire could impede the operation of the impeller.

bilge pump bracket
Drilled bilge pump mounting bracket
crafting wire
Fine, flexible crafting wire 
Bilge pump bracket before wrapping in mesh
Getting the bracket ready to wrap with mesh screen
Taking a small mesh screen, I wrapped the bracket completely. I used some thin pieces of wire we had around the house from my wife's crafts' projects.

The wrapping process begins... I wrapped the bracket to make sure no debris could get in. This picture shows the wrap in progress. The final step was to tighten wire loops and pull out any kinks. I straightened all the areas where the mesh buckled up on the bottom of the bracket so it attached to the hull bottom snugly. (Somehow, I missed getting a picture of the final project.)
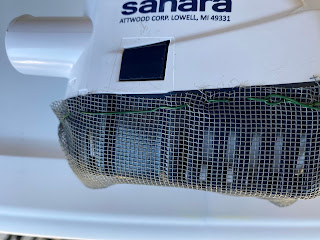
Bracket is wrapped with wire mesh.
Wrapping the base bracket with wire mesh.

I have an extra mounting bracket so if I ever need to change it, I can.

Final thought: will the finer mesh screen put a strain on the pump? What will be the longevity of the pump if it has to work harder to pull water into the pump? I have been using it this way for several months. If I can get several years out of it, great.


Here's the Scoop on Lithium Marine Batteries


Are They Worth It?


I had been considering buying lithium batteries for some time. But I wondered if it was the worth the cost. I decided to go for it when I discovered two of my four lead-acid batteries needing replacing.

A year ago, I had removed and reinstalled the batteries in order of purchase dates so the oldest battery would be the easiest one to remove. Oops — the newest battery in the hardest-to-reach spot is the one that died first. Go figure. The other battery needing replacement was the cranking battery. So, since I had to take them all out, I decided to go all in on lithium.


So I began researching. Most of the dealers I contacted didn't have a "deep cycle" version, but I found the Ionic battery and they have a 125AH battery that works as a cranking battery. It starts my 250 hp Yamaha with no problems. I bought three 12Volt, 100AH and one 12Volt, 125AH batteries.


So, it's too early to tell about life span. But this is what I have discovered:


  • Be prepared for a change in the way your boat handles. (Definitely peppier)
  • Depending on what size batteries you get, the space savings might not be as much as you hope. Because I bought the 100AH series, I used the old battery trays I already had.
  • You can fish several days without charging. (Not recommended for tournament days.)
  • The battery charger should have the lithium profile. (I had to buy a new charger too.)
  • The batteries weigh less, so it makes it easier to lift and install them. (Especially handy for me.)
  • I can get on plane much easier even with a full tournament load and full livewells. (Now, my non-boater doesn't have to crawl toward the front deck to drop the nose. A huge safety concern I had.)
  • A full tournament day does not drain the 125AH cranking battery with livewells running, three electronic units, HydroWave, and Garmin Panoptix (not Livescope). (That was not the case with my old starting battery.)
  • Some anglers choose a single 36-volt battery. I considered getting two 36V batteries, but the cost was getting up there. I opted for the 12 volt batteries because if I have an issue with one, it is less money to replace just one.
  • My batteries arrived with a 60- to 70% charge. (The charge did not drop from the time they arrived to the time I installed and finally plugged them in to charge the first time.)
  • The batteries have built in Bluetooth so you can monitor them via an app. (How cool is that!)
The batteries can be purchased through several dealerships. 


Favorite Products — Minn Kota, Humminbird, etc. or?

Why Minn Kota and Humminbird


We're often asked for recommendations for bow mount motors and electronics. On our personal boat, we run Minn Kota Ultrex with Humminbird (bow and console) — and a Garmin with Panoptix on the bow too.

After recent introductions from other manufacturers, look for an update on this page.

The Minn Kota Spot Lock feature is the best thing going!


Here are some Minn Kota options for you;


The Minn Kota Terrova


Many people prefer the cable/power assist models rather than all power steering, however—


Our recommendations in order—

These are good.


These are better options. Get the i-pilot link with remote:
Be sure to get the remote because it costs more to add it later.


These are best—for the easiest deployment (lowering and raising the motor). The motors are heavy and depending upon your physical condition, this may be the best option for you:


Important, be sure to get the i-pilot link and remote, no matter the motor you choose!

Humminbird
Get the new MEGA Down internal transducer on the Minn Kota so you can get a better image on a bow mount Humminbird unit. If you are not concerned about that, go with the standard U2 but you're probably going to want the MEGA Down capability.

If you are going to mount on your transom/back only, then the SI/DI transducer will do the job. The question becomes...how big of a screen do you want?

We recommend 10-inch minimum. Go bigger if you can.

Here are Helix options:


To get mapping capabilities go with Lakemaster for Humminbird if you are looking for individual mostly northern states. (We prefer Navionics because we travel a lot and need good regional coverage.)


Boat Loading and Launching Made Easy

Easy Way to Load Your Boat on the Trailer


One of the hardest things about boating is getting your boat on the trailer and hooking up the winch strap while still in the water.

On my boat, I can't reach the winch strap and crank without leaning way over the bow or getting out of the boat, stand on the trailer tongue and hook up the strap. It is slow and clogs up the ramp.

Normally, when you launch, you undo the winch strap to back the boat off the trailer. Some guys undo it at the boat prep area on the ramp. I prefer to undo the strap at the waters edge and then get in the boat.

Getting the boat on the trailer is also tricky and worrisome. I know some guys drive on the trailer until it hits the bow roller and then have their partner drive up the ramp.

I almost bought one of those step systems you attach to the trailer for $500. That works but you still have to get out of the boat, hook up the strap, and then get back in the boat.

I don't trust either method. I've seen too many boats slide off the trailer on the ramp. And even if the boat doesn't slide off, it may slid back a little so the strap is not tight. Then the bow bounces when driving down the road every time you hit a bump.

Not good.

I recently installed a product that makes launching and retrieving safe, painless and easy.


Boat latch installed
Catch-N-Release Boat Latch
Boat latch installed
Close up photo

It is called the Drotto Catch-N-Release Boat Latch. It is pictured here. It replaces the bow roller on your trailer.

To launch your boat, back in the trailer, pull the lever on the latch and your boat is free. (You can undo the main winch strap at the boat prep area before backing into the water.)

One thing you can do is loop a small cord through a hole on the lever, get in the boat, hold the cord, and have your partner back you in. While seated at the console, pull the cord to release the latch and your floating free. It only takes seconds.

Some guys attach the rope to the lever, but it is better to loop the rope through the lever, without tying it to anything and hold both ends of the rope. Once you activate the lever, release one end of the rope and hold the other end. The rope will slide through the lever hole and then you pull the rope into the boat and store it away until next time.

The beauty of the boat latch, however, is loading your boat. Drive on the trailer, the latch automatically activates and your secure. Drive up the ramp and then attach the winch strap and safety chain if you have one.

It was easy to install and we did it the hard way. I removed the winch post, slid the latch into position and gently slammed it on the bow eye. The reason I did it this way is because I knew I would need to move the winch post forward a little. We installed the latch and then reinstalled the post. But that also required putting a floor jack under the boat and lifting a little to get the post back in place.

It would be easier to do this at the lake. Launch your boat. Install everything and then reload the boat. If you have to move the post, launch the boat and move the winch post and retrieve the boat.

Watch this short video again to see how simple it is to load your boat.

Loading your boat video.

The boat latch comes in several sizes. Measure the width of the bow roller to determine which size you need. (Don't include the outer rollers. Just the actual roller between the bracket.)

(I buy a lot of stuff on eBay so I get coupons once in a while. I used a 20% off coupon to order mine.)

Getting the right size is important.

You can choose from a 3-inch wide model, 3.75-inch model and a Ranger Boats specific model. My trailer needed the 3.75-inch model (Phoenix Boat).


Truck Bed Cover: Retrax vs. Roll N Lock


-->

The best truck bed cover options

I decided not to go with a truck shell. Sometimes I need to haul taller objects that don’t fit under the shell. For the same reason, I didn’t want a hard tonneau cover (although they look really nice when matched to the same color as the vehicle.
The remaining options are to get a bed cover. So many different choices. But I choose to not let the cost be the determining factor this time. I didn’t feel a fold up cover would be secure because there are so many break-ins around boat ramps anymore.
Thieves figure our unattended trucks are an easy target. Even with an alarm, you’re out of earshot once you leave the dock area. So, I like the retractable bed covers.

My previous truck was a GMC Sierra 1500

On my previous truck I had the Roll N Lock. It worked well. I choose that one because it looked like the best option that was displayed in the local truck accessory shop.
Roll N Lock bed cover
Roll N Lock Truck Bed Cover
The Roll N lock served me well and I didn't have many issues. 
However, on an uneven surface, it was hard to open. 
And several times, when I wasn't careful to make sure the cover was connected to the tail gate, it slid open. I had some gear fly out. It was my fault, but make sure the cover is securely closed.
Also, the Roll N Lock is covered with a fabric so I was worried about it fading in the hot Texas sun.

My new Ford F150 bed cover

RetraxProMX in Matte Black
This time I did some searching online for all the options. I found the Retrax. It looked nice in the matte black finish and seemed more durable than the soft vinyl-like fabric covering of the Roll N Lock.
The RetraxPro MX retractable cover offers some great options:
It is durable.
The aluminum matte finish is sturdy, which for me was was preferable to the RetraxONE polycarbonate finish.
Unlike the Roll N Lock, you can lock down the cover anywhere along the running track. (The Roll N Lock has set positions where the cover will stop.)
Unlike the Roll N Lock, the cover doesn’t require pulling it all the way to the tailgate to lock it.
I bought the cover online through eBay. I made sure to get the correct model without cutouts for the top rail tie down holes because my truck had a protection cap over the top of the bed side.
Retrax Bed Cover
The matte black looks great with my black truck
One thing I discovered when I began to install it was that nowhere did I read before hand that if you have a drop-in bed liner like I do, that you have to notch out the liner for the canister to fit. I didn’t discover that until I opened the box and began looking at the installation instructions. By this time I had the cover out of the box and was really anxious to get it installed. I had to stop and run and get a tool to cut a notch in the bed liner. That made what would have been an easy one hour or less job turn into nearly two hours by the time I went to the Home Depot store and back.
After cutting out a little triangle in the bed liner, installation went without a hitch.
One note: the Retrax canister is a little larger than the Roll N Lock so you lose some bed space.
I really like the Retrax over the Roll N Lock but I was not unhappy with the Roll N Lock because I didn’t know any better on the previous truck.
I found the best price on eBay and installed it myself. It was easy if you have any ability. But it's nice to have someone help you lift it in place.
I searched for a listing that says "make offer," so I sent in an offer for a little less than the listed price and was able to save a little more money too.

Make Your Tow Vehicle Shine

When I was shopping for new truck, I found a model with everything I wanted at a good price.

Only it was black. Not my first choice.

Black looks great when it is clean and shiny. But it's not easy.

The first thing I did when I got the truck is go to a hand car wash. I had it washed and waxed. It looked great—for a few days.

Then the water spots from a recent rain looked terrible. I was looking for a way to keep it shiny. My cousin recommended a product called F11.

I ordered two bottles (I wasn't sure how much to get, and if it worked, I was going to do both vehicles and the boat.

I followed the simple instructions and the truck looked good. Then a few days later I put on a second coat. And about a week later the third coat.


I ended up using a bottle and a half of the 16 oz size. That is probably more than I needed to do, but I was anxious to have something easy to maintain. And, I kept the application cloth soaked in the product so I wouldn't scratch the paint.

One day I was in a store parking lot (cleaning off bird splatter) and a couple guys walked by and commented on the shine. I knew I was onto something.

At work, people comment about the shine of my truck. I purposely park next to other dark vehicles so they can see the difference.

Sometimes the truck get dusty from daily use. I bought a fine cleaning brush called a California Carduster at Walmart. Just dust off the vehicle with a light touch.

But no matter what, you're going to get water spots from rain or in my case, the lawn sprinkler. It leaves little spots. Sometimes it gets dirty from road grime. But rather than re-apply F11, I rinse off the vehicle at the car wash. (I have hard water at my house so I don't like to use my hose.)

No need to use the soap. If it's really dusty/dirty I use the rinse cycle, wipe everything off but leave it wet. (I use the same soft cloth I used to apply F11.)

Next, I rinse with the spot free cycle. I wipe down with a dry micro fiber towel (it may take more than one towel.) and then buff lightly with another dry towel. I follow the same basic steps as when I applied the F11. That final wipe down brings out the shine. Don't rub too hard so you don't scratch the surface. It's been about 6 months since the first F11 application and I don't plan to reapply F11 for another month or two.

There may be better tips. How do you keep your tow vehicle shiny?


Boat Trailer Bearings/Hubs

I've had bearing issues on my boat trailer.

On the suggestion of a friend, I'm replacing the whole hub assembly on the axles.

There are various sizes, but here is one for heavy duty use. You'll need to know the diameter of your spindle.

Check out this size which fits many boat trailers. I'm going to try to find the sizes of various manufacturers and make a chart of the Vortex hub needed for many boat trailers.


Be sure to get the right size for your trailer! If you click below to go to eBay, you can search for other sizes too.

The one to get is the Lucas Marine Grease-filled hub.


Top 3 Black Friday Ideas

Tackle Junkies Love Black Friday

This is a great time of year to find great deals on new tackle or replacing lost tackle.
picture of fishing reels
New fishing reels on sale for Black Friday

And frankly, some stuff just wears out and needs to be replaced. Here are some deals I like.

Idea one. Get a great rod.

My favorite rod brand is Kistler Rods.

Here is another tip: go to the Kistler website and sign up for the email list so you get notified when new sales come around.

If your family is looking for ideas to get you for Christmas gifts, suggest they buy you a new Z-bone rod.

Idea two.

Everyone needs more tackle. If you are looking for general tackle sales, check out Monster Tackle (Outdoor Pro Shop).

I have bought a lot of tackle from Monster Tackle and they are easy to work with. Plus, some of their non-sale prices throughout the year are less than many other online stores.

Idea three. Get new reels at a good price.


Here's a bonus tip:


How to Catch Bass at Night — 20 great tips

Here are 5 things to know to catch bass at night — plus 15 more tips for success.

When it gets so hot that just picking up a rod from the boat deck can burn your hand, it’s time to enjoy the nightlife.


Photo of bass boat running toward the sunset.
Getting to your favorite spot before it is too dark can be helpful.

Much like daytime movements, bass position themselves on structure and around cover. 

Their active moods are dictated by light such as moon brightness or ambient lighting from dock lights. 

A full moon doesn’t always mean the best fishing. These are the things to look for first:

  1. When there is too much light, such as a full moon, the bass can be anywhere and tend to stay deeper. Fish much of the same deep structure you do in the day. 
  2. When it is darker (quarter or new moon, for example), the bass congregate in specific areas—but especially hover around dock lights.   
  3. Bass relate better to under water lights than above water lights. Keep an eye out for those. But, what really helps is green lights over white lights. So the best option for night fishing is underwater green lights.      
  4. Use the same lure color schemes as in daylight—dark nights, dark lures; bright nights, and bright lures.     
  5. Don’t be afraid to go big. Big jigs, 10-inch or longer worms, etc. when fishing in the dark. Go with very small, natural looking lures if you fish right in the lights. (Caveat as usual—these tips are starting points. Change often if they’re not working.)     

Photo of a bass caught in the night
This bass fell to a black spinner bait in the pitch dark.

Fishing at night requires some planning and preparation. Things can wrong in a hurry in the dark.

Use these tips to stay safe and have a great experience. Remember, safety is the number one concern.
  • Check the weather before you go. Stormy conditions can be more treacherous at night when you can’t see. 
  • Scout the lake for possible fish holding locations in the daylight. If your electronics have GPS, set up a path to follow to get to your spots. 
  • It is hard to spot obstructions at night. Slow down. And even at a slow speed — barely on plane — hitting a floating log can do a lot of damage and cause serious injury. 
  • One of the most common boating mishaps is running into a dock at high speed at night. You lose your perspective of distance in the dark. 
  • Even when your eyes adjust to the dark, when you run from spot to spot, the running lights can put off enough light to partially blind you. 
  • Always wear clear safety glasses at night to protect your eyes from insects as you drive from spot to spot and to save your eye from snagged lures that can come flying back at you with no notice. You know you’re going to hang up and when you attempt to get the lure unsnagged, you won’t see it coming. Getting stuck with a hook in a body part is bad enough, but it is catastrophic if it’s in your eye. 
  • Make sure your navigation and anchor lights are working correctly.   
  • Get a good inflatable life jacket and wear it all times; it’s easy to lose your balance and fall out of the boat in the daytime—it’s even more likely to happen at night. 
  • A spotlight is very useful for navigating when it is very dark. 
  • Keep safety gear such as a throw-able float cushion and fire extinguisher readily accessible 
  • Make sure your cell phone is charged and in a safe, waterproof area. I keep mine in a zip lock bag in the glove box. Carry a phone charging cord to plug into the 12V accessory port or a portable cell phone battery booster in case the big engine battery dies. 
  • Cell service is not a guarantee on many sprawling lakes so be prepared with another form of signal device. 
  • Keep a small portable battery charger in the boat, one suitable for starting cars and big engines. There are many options for under $100. 
  • Let people know where you are and when you will be back.  It seems so simple, but it has saved numerous lives when followed.
  • Don’t forget to pack rain gear and jackets. Even a slight drop in daytime temperatures can cause a chill. Some lakes are susceptible to cooling air temperatures at night. Especially, lakes/rivers with a big inflow from upstream dams releasing colder water. 

By shopping with these affiliates you're supporting this blog! #sp


Amazon Has Great Deals on Fishing Rods and Reels


Summer Night Fishing

How to Catch Bass at Night — 20 great tips

Here are 5 things to know to catch bass at night — plus 15 more tips for success. When it gets so hot that just picking up a rod from the b...

Popular Posts